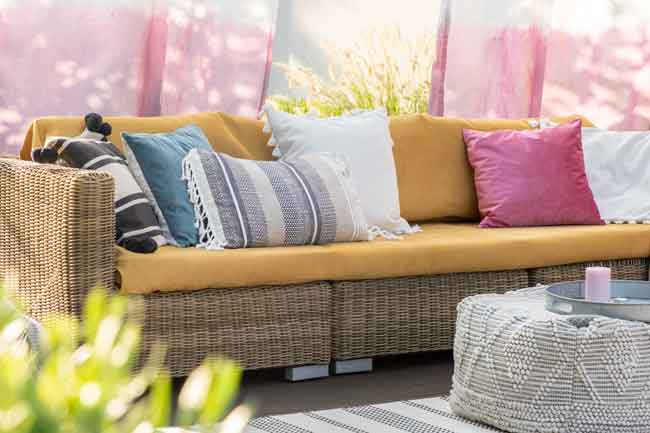
The warmer weather has finally arrived and is here to stay, which means it’s time to brush the dirt off the outdoor seating. If you’ve owned your outdoor furniture for a while, it’s likely that it’s in need of some attention. This doesn’t mean that you have to replace it though. If it’s a quality set, all you might really need to do is reupholster it.
But how do you know if it’s worth reupholstering in the first place? Well, that’s a very valid question and one that can easily be answered by taking a few things into consideration, such as:
- How long have you owned the sofa or chair on your patio? In most cases, a good set of outdoor furniture lasts about 20 years. If the framework isn’t that old and the construction is still in good shape, it’d probably be worth reupholstering.
- Is being environmentally friendly important to you? Preserving the furniture you currently have helps you leave a smaller environmental footprint by not adding to landfills unnecessarily.
- Do you still like the look of the furniture? Or, do you want to change styles?
- How much are you willing to spend? Evaluate the difference between the cost of recovering and buying new. If it is as little as a $100 gap then buying new may be the better way to go.
In the end, the answers to the questions above are what will guide your decision on whether or not recovering is the way to go.
If you’ve made the decision to recover your outdoor furniture, you’ve got to make sure that it will last. To do this, it’s important that you specifically select indoor/outdoor fabric, which can be found at most, if not all, fabric stores. The outdoor fabrics available today are incredibly durable while remaining beautiful. Once you have your favorite color or pattern picked out, you’re ready to start your project.
Outdoor Furniture Reupholstering Instructions
To begin, you’ll need to gather all of your supplies, which include:
- Fabric (for best results, prewash it)
- Padding material
- Thread
- Needles
- Pencil
- Utility knife
- Needle nose pliers
- Scissors
- Staple gun
- Fabric glue (optional)
Step 1:
Strip the outdoor furniture down to the frame. Set cushions and pillows aside before you start removing the old fabric. Cutting carefully with the utility knife, pop the stitching along the seams, preserving the old fabric to the best of your ability (doing so will make it easier when it comes time to measure the new fabric). Keep the needle nose pliers handy to tackle any staples you come across.
Step 2:
Remove any old padding and stuffing. Over time, the padding and stuffing inside seating cushions can become flat, which is something you don’t want to have with new fabric. Just like with the old fabric, try to leave the old padding intact so measuring the new padding will be easier.
Step 3:
Measure the old fabric and transfer onto the new. Separate the old fabric that has been removed, laying out each individual piece so it can be measured accurately. Once you have your measurements, transfer them onto the fabric, one section at a time. Cut pieces as you go, laying them out according to their order of installation, to avoid confusion when it’s time to sew. Measure and cut the new padding and stuffing pieces as well. Lay them out in their proper position on the furniture so they are ready to be attached to new fabric panels.
Step 4:
Sew it together. It’s best to start with the largest panels first. In most cases, those will be the middle and back sections of the furniture. Once those are done, you can move onto attaching and sewing the smaller panels. If the large panels have been sewn to fit properly, then the small ones should fit as well. Don’t forget to finish up all of your fabric cushions during this step.
If you aren’t as handy with a needle and thread, there’s another option: iron-on adhesive tape. When using iron-on tape, lift the top of the fabric, placing the adhesive strips right next to the cushion. Turn your iron on the medium setting and iron the strips into place. After the strips have cooled, pull the backing off of them and put the fabric back in place and iron the other side.
Step 5:
Reinstall the cushions. Once the cushions are reupholstered, you can replace them on the furniture.
It might seem like a lot of work, but the savings you’ll get by not having to replace the entire set will be worth it. Furthermore, doing the work yourself will allow you to have your outdoor seating looking exactly as you want.
When the time comes to update your outdoor space by revamping your outdoor furniture, stop by our Cutting Corners showroom near Fort Worth, TX so we can help you out. We have a wide array of discount designer fabrics as well as a beautiful selection of quality outdoor fabrics. There’s something suited for every design style, making it incredibly easy to design an attractive outdoor space that you are sure to love.